Classic Knafeh (Kunafa) with Rosewater Syrup and Pistachios Recipe
Introduction
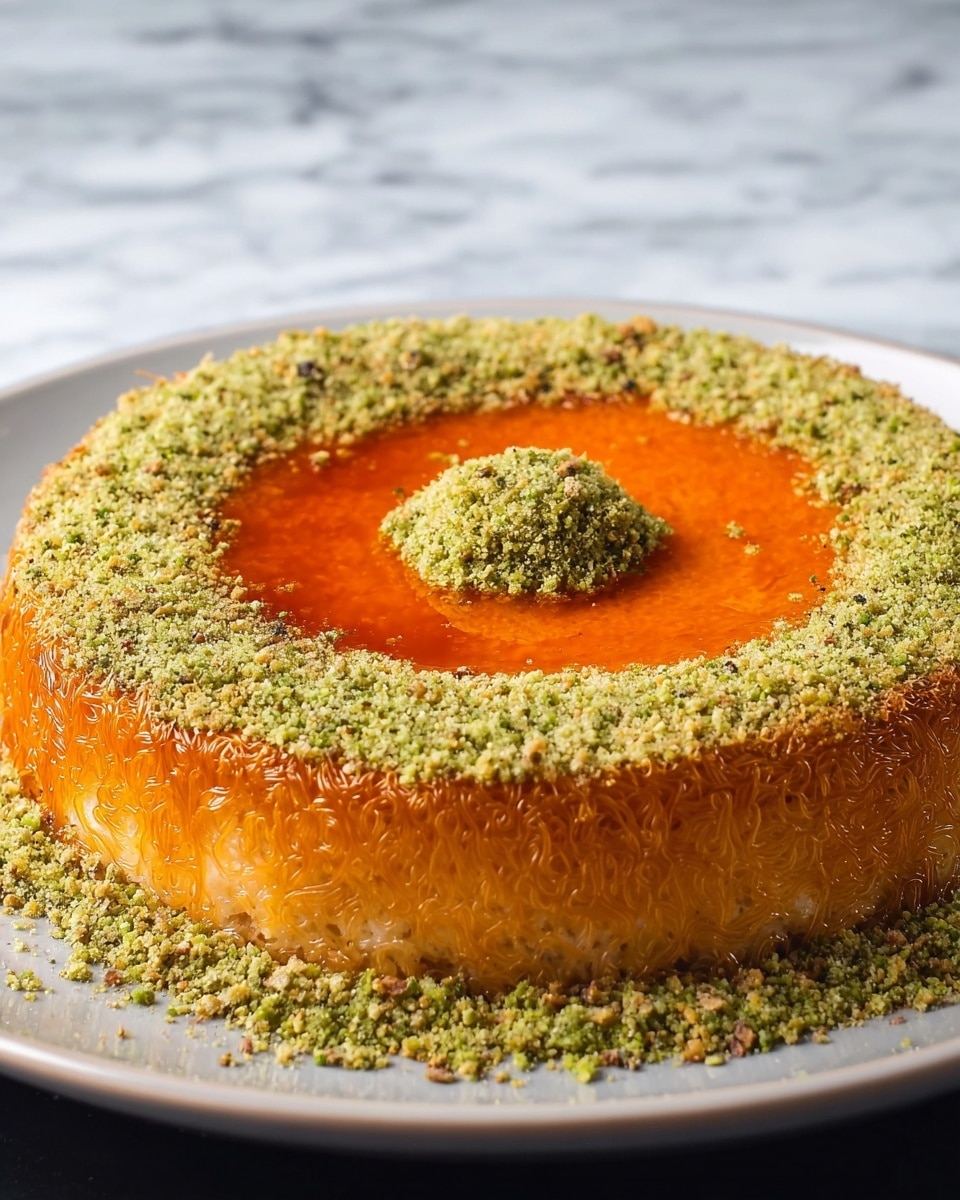
Knafeh is a beloved Middle Eastern dessert known for its crispy shredded filo crust and melted sweet cheese center. This luscious treat is soaked in fragrant rosewater syrup, creating a perfect balance of flavors that will delight your taste buds. It’s a great dessert to share with family and friends on special occasions or anytime you crave something sweet and comforting.

Ingredients
- 2 cups water
- 2 cups granulated sugar
- 1 teaspoon rose water
- 1 tablespoon lemon juice (optional)
- 16 ounces Kataifi dough (shredded filo dough), thawed
- 18 tablespoons melted butter, divided
- 8 to 16 ounces sweet cheese
- Crushed pistachios (optional)
- Kunafa powdered pastry coloring or harvest yellow food gel coloring (optional)
Instructions
- Step 1: In a small saucepan, combine sugar and water and heat over medium-high heat until the sugar dissolves. Remove from heat, let cool slightly, then stir in rose water and lemon juice if using. Set the syrup aside.
- Step 2: Mix 2 tablespoons of melted butter with the food coloring or Kunafa powder if using. Pour this colored melted butter into the bottom and sides of a 9-inch baking dish, swirling to coat evenly, then set aside.
- Step 3: Cut the thawed Kataifi dough into small ¼ inch pieces and place into a large bowl. Add the remaining 16 tablespoons of melted butter and mix thoroughly to coat all pieces.
- Step 4: Press half of the buttered Kataifi into the bottom of the prepared baking dish, using the bottom of a smooth cup to press evenly if desired.
- Step 5: Slice the sweet cheese thinly and layer it evenly over the pressed Kataifi. Use more cheese for a thicker filling.
- Step 6: Spread the remaining Kataifi dough over the cheese layer and press lightly to secure. Gently push the edges down with a spatula or butter knife.
- Step 7: Bake in a preheated 350°F oven for 40 to 50 minutes, until the top is golden brown and the butter bubbles along the edges.
- Step 8: Remove from oven and let cool for a few minutes. Carefully invert the knafeh onto a serving plate.
- Step 9: Sprinkle crushed pistachios on top if desired.
- Step 10: Pour half of the reserved rosewater syrup over the knafeh and serve the remaining syrup on the side.
Tips & Variations
- For a saltier flavor, substitute sweet cheese with a mix of ricotta and shredded mozzarella or use fresh mozzarella with excess moisture removed.
- Orange blossom water can be used instead of rosewater for a different floral note.
- Lemon juice in the syrup is optional but helps balance sweetness and enhance flavor.
- Using food coloring or Kunafa powder gives the dessert its traditional vibrant color but can be omitted if preferred.
Storage
Store leftover knafeh covered in the refrigerator for up to 3 days. Reheat gently in the oven at low temperature to restore crispness before serving. Do not microwave as it may make the crust soggy.
How to Serve
Serve this delicious recipe with your favorite sides.
FAQs
Can I use regular filo dough instead of Kataifi?
Regular filo dough has a different texture and thickness, so while you can try it, the crispy shredded effect of Kataifi is essential to authentic knafeh.
What is the best cheese to use for knafeh?
Sweet cheese specifically made for knafeh is ideal, but fresh mozzarella with excess moisture removed or a mix of ricotta and mozzarella can be used as substitutes, though they may yield a slightly saltier dessert.
PrintClassic Knafeh (Kunafa) with Rosewater Syrup and Pistachios Recipe
Knafeh is a traditional Middle Eastern dessert featuring shredded filo dough layered with sweet cheese, baked to a golden perfection, and soaked in fragrant rosewater syrup. Topped with crushed pistachios, this rich and buttery pastry is perfect for special occasions and celebrations.
- Prep Time: 20 minutes
- Cook Time: 45 minutes
- Total Time: 1 hour 5 minutes
- Yield: 8 servings 1x
- Category: Dessert
- Method: Baking
- Cuisine: Middle Eastern
Ingredients
Syrup
- 2 cups water
- 2 cups granulated sugar
- 1 teaspoon rose water
- 1 tablespoon lemon juice (optional)
Dough and Filling
- 16 ounces Kataifi dough (shredded filo dough), thawed
- 18 tablespoons melted butter, divided
- 8 to 16 ounces sweet cheese (such as Akkawi or Nabulsi cheese)
Toppings and Color
- Crushed pistachios (optional)
- Kunafa powdered pastry coloring or harvest yellow food gel coloring (optional)
Instructions
- Prepare the syrup: Combine sugar and water in a small saucepan over medium-high heat and stir until the sugar dissolves completely. Remove from heat and let it cool slightly. Stir in the rosewater and lemon juice, if using, and set aside.
- Color the butter (optional): Mix 2 tablespoons of melted butter with Kunafa powdered pastry coloring or yellow food gel coloring if desired to achieve the signature orange hue.
- Prepare the pan: Add the colored melted butter to the bottom and sides of a 9-inch pie, cake, or knafeh pan. Swirl the butter to coat evenly, then set aside.
- Prepare the kataifi dough: Remove the kataifi from its packaging and cut it into small quarter-inch pieces on a cutting board. Place the chopped dough into a large bowl.
- Butter the dough: Add the remaining 16 tablespoons of melted butter to the bowl with kataifi and mix well until all pieces are thoroughly coated with butter.
- Layer the bottom dough: Press half of the buttered kataifi firmly into the prepared pan, using the bottom of a smooth cup or measuring cup to press evenly.
- Add the cheese layer: Slice the sweet cheese thinly and layer it evenly over the kataifi in the pan. Use more cheese for a thicker filling; up to 16 ounces was used in the recipe photos.
- Top with remaining dough: Place the remaining kataifi dough over the cheese layer and press lightly to level. Gently push the edges of the dough down using a spatula or butter knife to seal.
- Bake: Preheat the oven to 350°F (175°C). Bake the knafeh for 40 to 50 minutes until the top is golden brown and the butter bubbles up along the sides.
- Cool and invert: Remove the knafeh from the oven and allow it to cool slightly. Once cooled, invert the knafeh onto a serving plate (a pizza pan works well).
- Garnish and serve: Sprinkle crushed pistachios on top if desired. Pour half of the reserved and cooled rosewater syrup over the knafeh and serve the remaining syrup on the side.
Notes
- Fresh mozzarella with excess moisture removed can substitute sweet cheese.
- A blend of ricotta and shredded mozzarella may be used instead, though the dessert will be saltier.
- Orange blossom water can substitute rosewater for a slightly different floral aroma.
- Lemon juice in the syrup is optional but adds subtle brightness.
Keywords: Knafeh, Middle Eastern dessert, shredded filo dough, sweet cheese dessert, rosewater syrup, pistachio topping, baked pastry