Easy Homemade Twinkies That Bring Back Sweet Memories Recipe
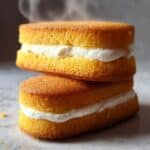
This recipe for Easy Homemade Twinkies offers a delightful, nostalgic treat made from scratch. Featuring a tender, fluffy cake filled with a sweet, creamy vanilla filling, these Twinkies bring back the charm of the classic snack with a homemade touch. Perfect for those craving a nostalgic dessert or wanting to customize their ingredients including gluten-free and dairy-free options.
- Prep Time: 15 minutes
- Cook Time: 20 minutes
- Total Time: 35 minutes
- Yield: 8 Twinkies 1x
- Category: Dessert
- Method: Baking
- Cuisine: American
- Diet: Gluten Free
Ingredients
Scale
For the Cake
- 1½ cups All-Purpose Flour (can substitute with gluten-free flour blend)
- 1 cup Granulated Sugar (adjust for a lower-sugar option)
- 1 tbsp Baking Powder (acts as a leavening agent)
- ½ tsp Salt (enhances the overall flavor)
- ½ cup Unsalted Butter (can be swapped with coconut oil for dairy-free)
- 3 large Eggs (can use flax eggs for a vegan option)
- ½ cup Milk (opt for dairy-free milk if lactose intolerant)
- 1 tsp Vanilla Extract (essential for the cake flavor)
For the Filling
- 1 cup Powdered Sugar (creates a sweet, smooth filling)
- 1 cup Heavy Cream (use a plant-based heavy cream for dairy-free)
- 1 tsp Additional Vanilla Extract (use pure vanilla for best taste)
Instructions
- Preheat Oven and Prepare Mold: Preheat your oven to 350°F (175°C). Lightly grease a Twinkie mold or a baking tray to prevent sticking.
- Mix Dry Ingredients: In a mixing bowl, whisk together all-purpose flour, granulated sugar, baking powder, and salt until well combined to ensure even distribution of leavening and flavor.
- Cream Butter and Sugar: In a separate bowl, use an electric mixer to cream the unsalted butter and sugar together until the mixture is light and fluffy, which helps create a tender cake texture.
- Add Wet Ingredients: Beat in the eggs, milk, and vanilla extract to the creamed butter mixture until fully incorporated, forming a smooth batter.
- Combine Wet and Dry: Gradually fold the dry ingredients into the wet mixture, stirring gently just until blended to avoid overmixing which can toughen the cake.
- Fill Mold and Bake: Pour the batter into the prepared Twinkie molds or cavities, filling them about halfway to allow room for rising. Bake in the preheated oven for 15-20 minutes or until the cakes turn golden brown and a toothpick inserted comes out clean.
- Cool Cakes: Allow the cakes to cool in the mold for about 5 minutes to set, then transfer them to a wire rack to cool completely before filling.
- Prepare Filling and Pipe: Whip together powdered sugar, heavy cream, and vanilla extract until smooth and fluffy. Using a piping bag, carefully pipe the creamy filling into the cooled cakes until they are nicely filled.
Notes
- For a gluten-free version, substitute all-purpose flour with a gluten-free flour blend.
- Use coconut oil instead of butter and plant-based milk and heavy cream for dairy-free or vegan options.
- If vegan, replace eggs with flax eggs (1 tbsp ground flaxseed mixed with 3 tbsp water per egg).
- Be careful not to overmix the batter to keep the cakes light and fluffy.
- Twinkie molds help achieve the classic shape but using a baking tray will also work; just adjust portion sizes accordingly.
- Make sure the cakes are completely cool before piping the filling to avoid melting the cream.
Keywords: Homemade Twinkies, Twinkie recipe, nostalgic dessert, classic snack, vanilla cream filling, easy homemade cake
