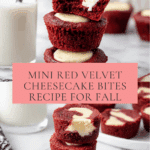
Mini Red Velvet Cheesecake Recipe
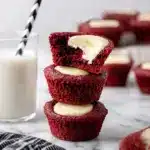
These Mini Red Velvet Cheesecakes combine the rich flavors of red velvet cake with a smooth, creamy cheesecake center. Perfectly sized as bite-sized treats, they offer a delightful balance of moist cocoa-infused cake and luscious cheesecake filling, ideal for parties, snacks, or dessert anytime.
- Prep Time: 20 minutes
- Cook Time: 9 minutes
- Total Time: 40 minutes
- Yield: 24 mini cheesecakes 1x
- Category: Dessert
- Method: Baking
- Cuisine: American
- Diet: Vegetarian
Ingredients
Scale
Red Velvet Base
- 1 cup all-purpose flour
- ¼ cup + 1 tablespoon unsweetened cocoa powder
- ¾ cup salted sweet cream butter, melted and cooled
- 1¼ cups granulated sugar
- 1 tablespoon red gel food color (Sunny Side Up Bakery brand recommended)
- 2 teaspoons pure vanilla extract
- 2 large eggs, room temperature and beaten
Cheesecake Filling
- 8 ounces cream cheese, softened
- ¼ cup granulated sugar
- 1 teaspoon pure vanilla extract
- 1 large egg yolk
Instructions
- Prepare the Oven and Pan: Preheat the oven to 350°F (175°C). Spray a mini muffin pan thoroughly with nonstick cooking spray and set aside to ensure easy removal of the cheesecakes.
- Mix Dry Ingredients: In a small mixing bowl, whisk together the all-purpose flour and unsweetened cocoa powder until combined evenly. Set aside for later use.
- Combine Red Velvet Base Wet Ingredients: In a medium-sized mixing bowl, whisk together the melted and cooled salted sweet cream butter, granulated sugar, red gel food color, vanilla extract, and beaten eggs until smooth and well incorporated.
- Add Dry to Wet: Gradually stir the flour and cocoa powder mixture into the wet ingredients. Stir just until all the dry ingredients are incorporated to avoid overmixing, which can affect texture.
- Beat Cream Cheese: In a separate medium-sized bowl, use a handheld mixer set on medium-high to beat the softened cream cheese for about 1 minute until smooth and creamy.
- Add Sugar and Vanilla to Cheesecake Filling: Add granulated sugar and pure vanilla extract to the cream cheese and continue mixing for another 1 to 1½ minutes until everything is well combined and smooth.
- Incorporate Egg Yolk: Add the large egg yolk to the cheesecake mixture and mix only until the yolk is fully blended and no yellow streaks remain, careful not to overmix.
- Prepare for Filling: Transfer the cheesecake filling into a disposable piping bag or quart-sized ziplock bag. If using a ziplock bag, snip off a small corner for piping.
- Assemble Mini Cheesecakes: Spoon about 1 tablespoon of the red velvet batter into each cavity of the prepared mini muffin pan. Then pipe approximately 2 teaspoons of cheesecake filling into the center of each red velvet base.
- Bake: Place the pan in the preheated oven and bake for 8 to 9 minutes, or until the edges are set but the center remains slightly jiggly.
- Cool: Remove the pan from the oven and allow the mini cheesecakes to cool in the pan for 20 to 30 minutes to firm up before carefully removing them.
- Transfer and Serve: Once cooled, transfer the mini cheesecakes to a wire rack to cool completely. Serve chilled or at room temperature.
Notes
- Use room temperature eggs for better mixing and texture.
- Do not overmix the red velvet batter once flour is added to maintain a tender crumb.
- Ensure cream cheese is fully softened before mixing to avoid lumps in the cheesecake filling.
- Mini muffin pans work best for this recipe to create perfectly sized bites.
- Cooling them completely helps the cheesecakes set for easier removal and better texture.
- Store leftovers in an airtight container in the refrigerator for up to 3 days.
- For best flavor, allow cheesecakes to chill for at least an hour before serving.
Nutrition
- Serving Size: 1 mini cheesecake (approx. 25g)
- Calories: 110
- Sugar: 10g
- Sodium: 55mg
- Fat: 7g
- Saturated Fat: 4.5g
- Unsaturated Fat: 2g
- Trans Fat: 0g
- Carbohydrates: 9g
- Fiber: 0.5g
- Protein: 2g
- Cholesterol: 30mg
Keywords: mini red velvet cheesecake, red velvet dessert, bite-sized cheesecake, mini cheesecakes, red velvet recipe
Find it online: https://bakedbylisa.com/mini-red-velvet-cheesecake-recipe/